How to Use Force Curves to Fix Technique
You may know what a force curve is, and you might not. There’s no rule anywhere saying you need to know what your force curve looks like, or use it. However, it can be a useful tool to see how you’re applying power.
Confused? No worries. We will get into what a force curve is and how you can use it.
A force curve is a display on the Concept2 rowing machine. It’s a graph that shows your force applied to the machine over time. The larger the area under the curve, the more power you’ve put into the machine, the lower your split will be.
But it’s not all about getting the biggest area under the curve. WHAT the curve looks like is what you want to pay attention to.
An ideal force curve looks like this:
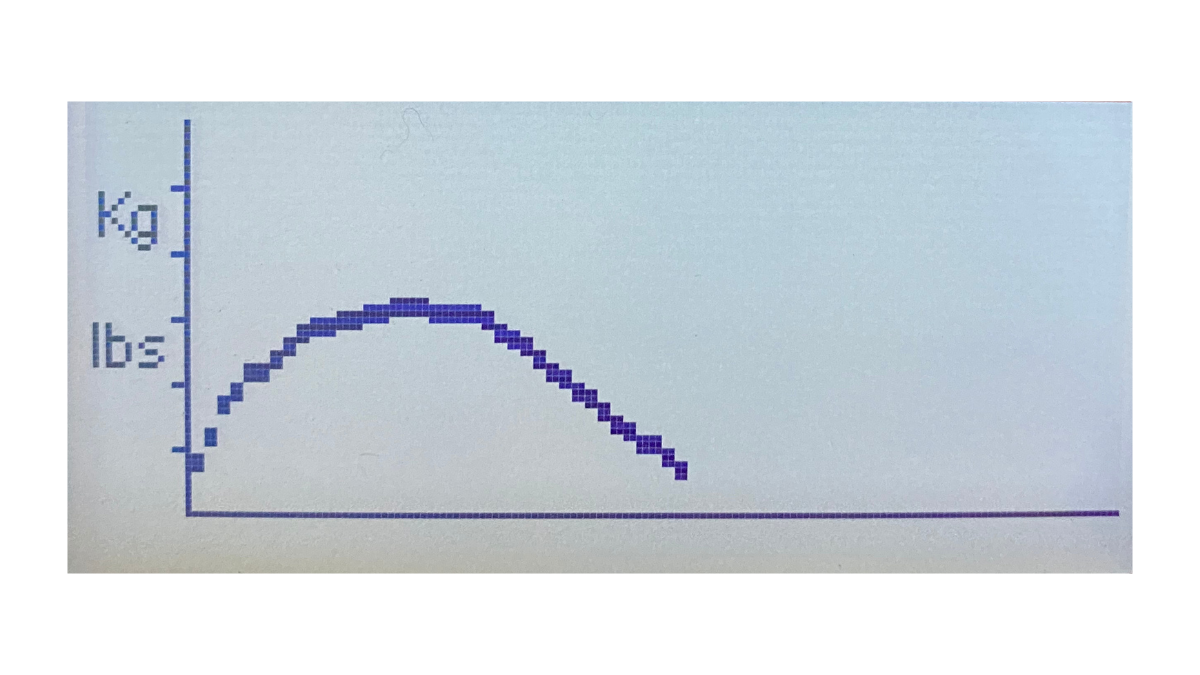
An ideal force curve is smooth. This tells you that the stroke flowed well from using the legs, to the back, to the arm pull. All parts of the stroke were utilized in an efficient way to maximize power.
What can a non-ideal force curve tell you?
A curve that looks anything unlike an ideal curve can point to technical issues in the stroke. What’s cool is, you can typically figure out what the technique error is depending on what the curve looks like.
DIP IN THE FIRST HALF
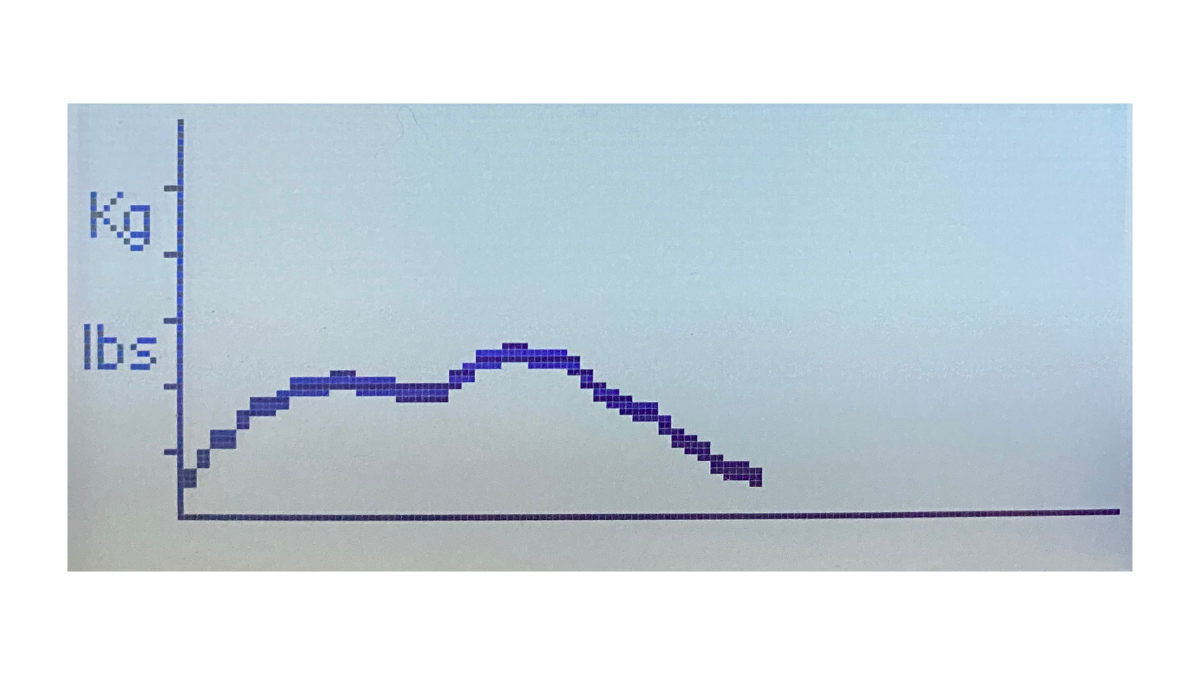
The first part of the curve has a strong upward start due to the leg drive. Then the connection of power is lost briefly and gained back. This leads us to look at the middle of the stroke, which is when the body swing should engage.
If there is a lack of body swing, then it’s harder to connect the power from the legs to the arms smoothly. When there is no swing from your hips the force dips, and returns when the arms engage.
Leaning back at the catch is one cause of this dip. Essentially the body swing is taken out of the stroke because the body has already swung open. When there is little to no body swing, the forces don’t connect well and lend to the dip in the force curve.
DIP AT THE END
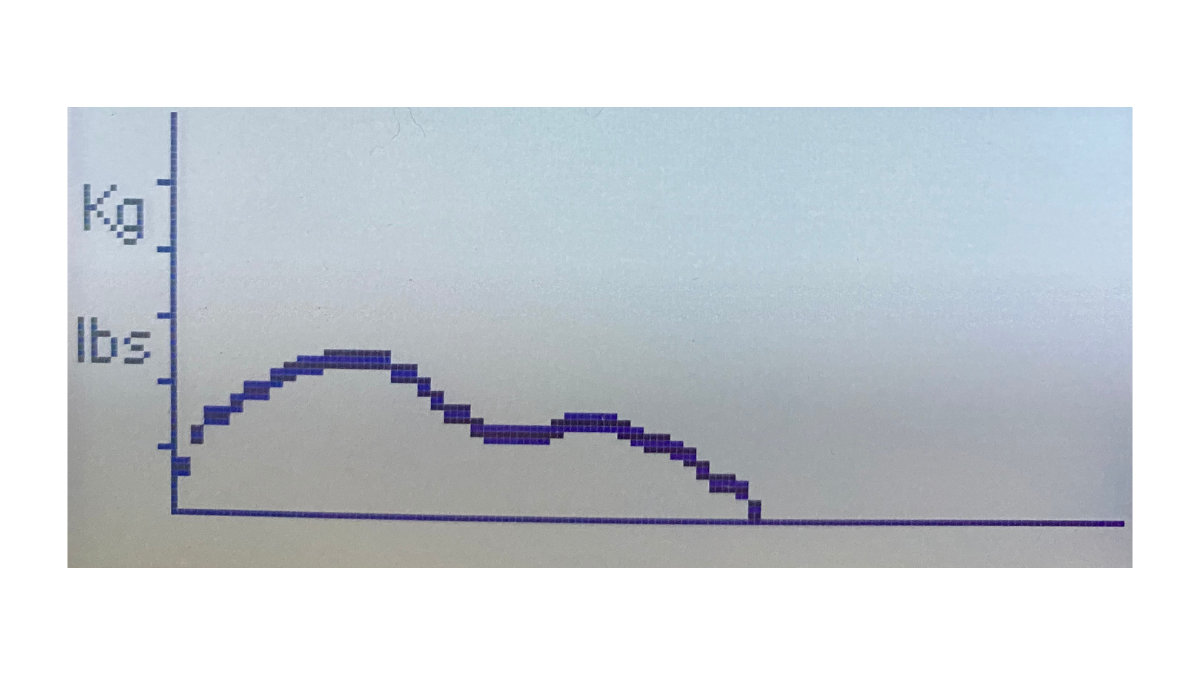
The stroke starts off well with a strong leg drive and does have some carry through with a body swing from the hips, but the dip at the end shows some power was lost, and then gained back at the very end.
The middle of the curve is showing us that the hip swing is connecting better. The slight increase at the end means the arms are doing some work also. This leads us to take a look somewhere in between the hips and the arms.
In between those two places, we have our upper back. When the back is rounded and loose, that tension is lost and not applied to the machine. Imagine a chain linking your feet all the way through your body and into the machine handle. When the back is rounded, it’s like having a break in the chain. Power is lost there!
So, when there is a dip at the end of the force curve there isn’t enough tension in the upper back to transfer all of the power.
CURVE DROPS OFF
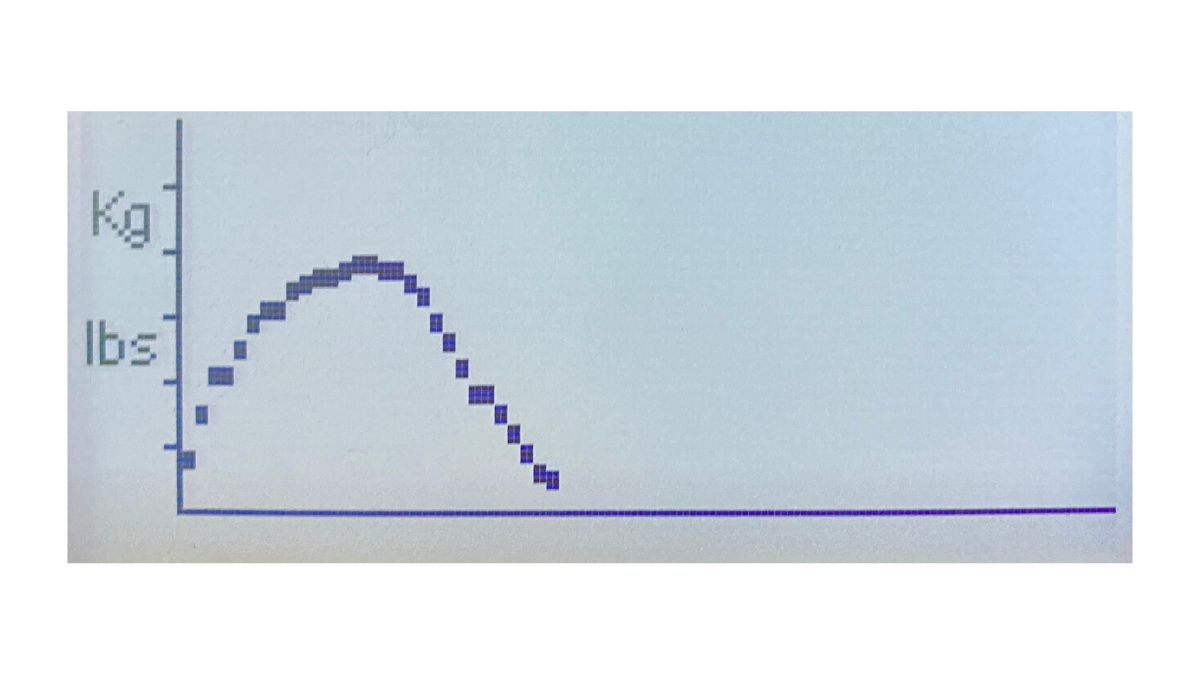
This curve gets high, and then very quickly drops off. In the beginning, there’s a good leg drive, but none of the power follows through into the hips and arms. This makes the curve drop off rapidly.
Rowing starts with a push from the legs. If that is overdone, it can lead to a dependence on your legs and not using the rest of your body. To create a more bell-curved shape, the power must be maintained through the hip swing and the arm pull.
FLAT START
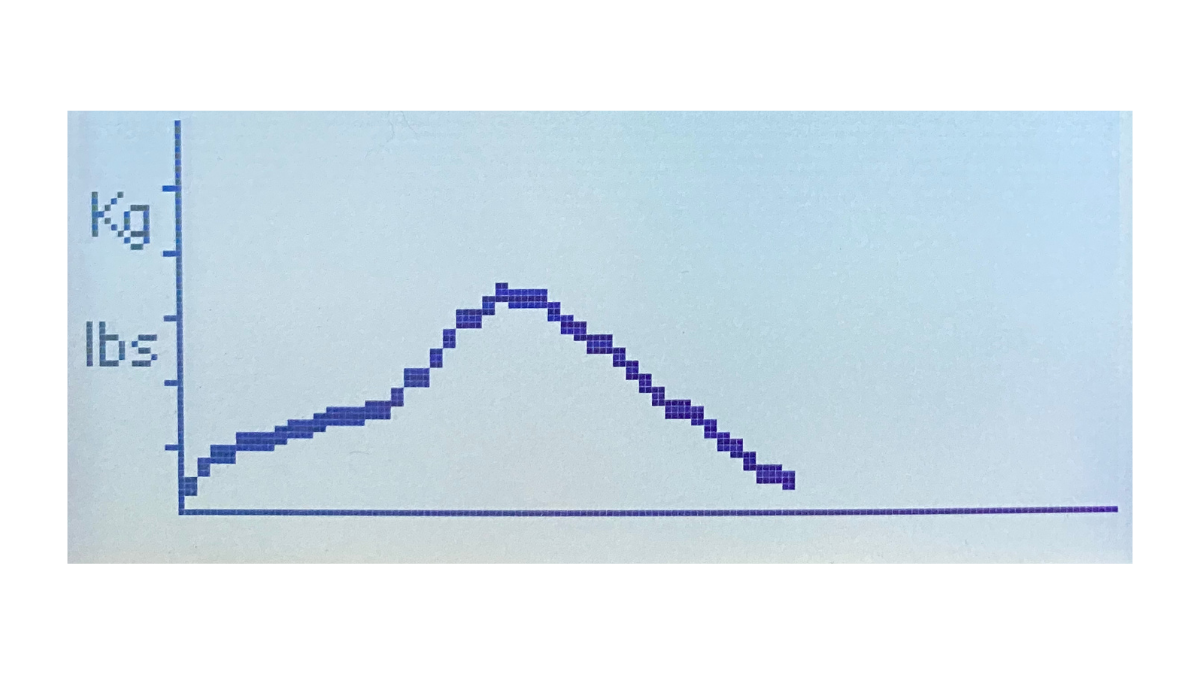
In this curve, the flat part shows that the leg drive isn’t creating a lot of power. Then, the body and arms kick in to make the curve go upwards. The delay of the curve is due to their not being a punch with the legs off of the catch.
Having a slow start to your stroke will cause the first part to be flat. It won’t be until the power kicks in that the curve will move upwards. Overcompressing at the catch can cause a slight delay in the curve beginning to travel upwards since it takes additional time for the heels to reach the footboards before they can really apply the power.
DIAGNOSING AND MOVING FORWARD
Staring at your force curve stroke after stroke may lead you to get very frustrated. Each stroke can vary, so it can be overwhelming taking in so much information at once. When you do want to look at your force curve, set some time to watch some strokes to see what overall shape it takes.
If there’s always a dip in the same place, use your workout to work on that specific part of the stroke. After you’ve given it some practice, go back and take a look at your curve to see if it has improved.
You’re dips and drop offs may not look as extreme as the ones shown in the pictures above. That lets you know that the disconnect is smaller, even though it’s still there.
I don’t recommend looking at the force curve screen during a long piece or intervals. There’s a lot of other things to focus on rather than trying to evaluate each curve as it shows up. Evaluating your force curve should be before a workout, where it can also be part of the warm-up. You can also look at your force curve when you’re done with a workout, to see if it changes when you’re tired.
The force curve is just another tool to use to work on your rowing. Don’t get too absorbed by it. It’s a good check to do every so often, but not every time you row. Working on technique and proper power application will improve your force curve over time.
The Sticky Catch Drill – with a twist!
The sticky catch drill is a great drill to feel the connection at the catch in your rowing stroke. And I have a different way of doing it that you may have never seen before. Most of the time, for the sticky catch drill, you can use a strap or something very sturdy...
Simplify Your Rowing Stroke
When you're just starting to learn how to row, it can be overwhelming watching technique videos, especially if it's a follow along drill or follow along workout where the coach is giving a lot of cues. Examples of cues are chest up, shoulders down, arms out then body...
Technique Tips for Rowing Safely
Safety is a big deal. When we want to improve our fitness, we don’t want to hurt ourselves in the process. There are a couple of key things to look for in your rowing stroke if you’re wanting to stay as safe as possible. I’ve grouped the technique considerations by...

